Github Action now lets you control the permissions granted to the GITHUB_TOKEN secret.
What is GITHUB_TOKEN
Let’s start with what the GITHUB_TOKEN is in GitHub Actions and how it works.
The GITHUB_TOKEN is a special access token that you can use to authenticate on behalf of GitHub Actions.
GitHub automatically creates a GITHUB_TOKEN secret for you to use in your workflow, and you can use it to authenticate in a workflow run.
The way this works is that when you enable GitHub Actions in a repository, GitHub installs a GitHub App on that. The GITHUB_TOKEN secret is basically a GitHub App installation access token.
Before each job begins, GitHub fetches an installation access token for the job from that GitHub App. Since the App has access to a single repo, the token’s permissions are limited to the repository that contains your workflow. And to make it even more secure, the token expires when the job is finished.
Hope the mechanism is now clearer. Let’s quickly see how to use a GITHUB_TOKEN
Use GitHub Token
There are 2 ways to use the token: from secrets and from the context.
- uses: actions/labeler@v2
  with:
    repo-token: $ secrets.GITHUB_TOKEN
In this first example we use the secrets.GITHUB_TOKEN to consume it. As mentioned, the secret is automatically generated so you can just use it straight away.
- name: Create a Release
  id: create_release
  uses: actions/create-release@v1
  env:
    GITHUB_TOKEN: $ github.token
Here instead we use the GitHub context, which contains the token. Note that the two are equivalent.
Personal Access Token vs GITHUB_TOKEN
If you are thinking “why should I use the GITHUB_TOKEN instead of my normal PAT?”, remember that a Personal Access Token is always available, so if someone is able to steal that PAT they can potentially do some harm.
The GITHUB_TOKEN instead expires just right after the job is over. So even if someone is able to steal it (which is almost impossible), they basically can’t do anything wrong.
Default Permissions
By Default, the GITHUB_TOKEN has a quite comprehensive list of permissions assigned to it.
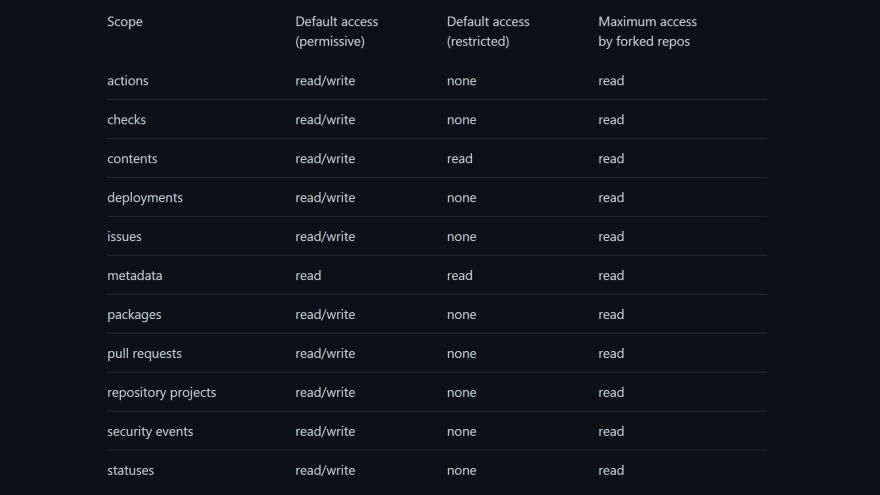 This table shows the permissions granted to the GITHUB_TOKEN by default. Good thing is that people with admin permissions to an enterprise, organization, or repository can set the default permissions to be either permissive or restricted.
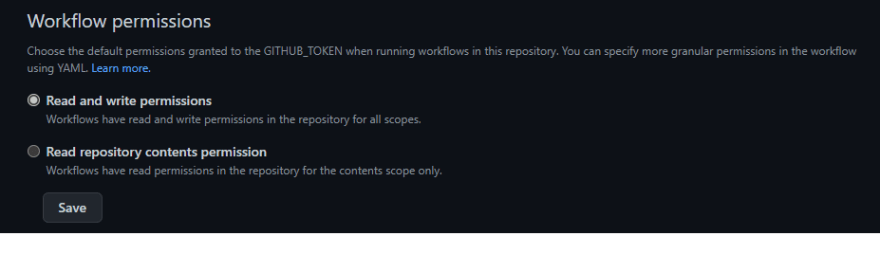 In here you can change the permissions assigned to your token by choosing Read and Write (which allows you to access the content and make changes) or Read-only.
Granular permissions via YAML
You can use the permissions key in the YAML workflow file to modify permissions for the GITHUB_TOKEN for an entire workflow or for individual jobs.
permissions:
  contents: write
  pull-requests: write
  issues: read
  packages: none
And you can use all the permissions that are listed in the table above. Additionally, as you can see below, it supports intellisense if you do it in the GitHub interface directly:
 When the permissions key is used, all unspecified permissions are set to no access, with the exception of the metadata scope, which always gets read access.
You can personalize the token permissions either at Job level, or at whole workflow level (or actually both):
[...]
permissions:
  contents: write
  pull-requests: write

jobs:
  job1:
    runs-on: ubuntu-latest

    steps:
      [...]

  job2:
    runs-on: ubuntu-latest
    permissions:
      issues: write
    steps:
    [...]
Conclusions
Hope you have now a better understanding about the GITHUB_TOKEN, what it does and how we can set its permissions properly. Let me know in the comment section below if you have any other questions about it.
Also, check out this video where I talk about creating Personal Access Tokens in GitHub.