Goal
If you access Proxmox VE at `https://172.27.135.44:8006/`, your browser warns “Not secure” because Proxmox ships with a self-signed (cluster) CA by default. That traffic is still encrypted, but it is not publicly trusted.
Requirements:
- Universal trust: no installing a custom CA into every client OS/browser.
- No /etc/hosts hacks.
- Proxmox management stays private (VPN-only / internal-only).
- DNS provider: cloudflare (domain: yanboyang.com).
- Proxmox VE: 9.1.4, cluster.
- Current access IP (internal): 172.27.135.44, port 8006.
This post describes the simplest model: DNS-01 via cloudflare, direct access to `https://pve.yanboyang.com:8006/`, with management still private.
Why DNS-01 is the right fit for “private Proxmox, publicly trusted certs”
Let’s Encrypt supports multiple ACME challenge types:
- HTTP-01 requires the CA to reach your server on port 80, and the hostname must resolve to a reachable public IP.
- DNS-01 proves you control DNS by creating a TXT record at _acme-challenge.<your-domain>. It works even if the service is private / not publicly reachable.
Proxmox VE supports both challenge types and explicitly documents DNS-01 as the option when external validation access “is not possible or desired,” requiring TXT provisioning “via an API.”
Why you need the Cloudflare API (even if you already added an A record)
Adding pve.yanboyang.com -> 172.27.135.44 as “DNS only” is NOT enough for Let’s Encrypt issuance/renewal. With DNS-01, every issuance/renewal requires creating (and later removing) a temporary TXT record under:
- _acme-challenge.pve.yanboyang.com
Let’s Encrypt strongly recommends DNS-01 only when your DNS provider has an API, because renewals must be automated to be practical.
So the Cloudflare API token is what allows Proxmox (via its ACME integration) to programmatically add/remove the TXT record during issuance and renewal.
Important privacy note (read before proceeding)
- Your hostname will be public. Let’s Encrypt certificates are publicly observable via Certificate Transparency systems.
- Your management UI stays private. Clients will resolve pve.yanboyang.com to 172.27.135.44 (a private address). Only users on your internal network/VPN can connect.
- Publishing a private RFC1918 address in public DNS is unusual, but technically valid. The main “leak” is that it advertises your internal addressing choice—not actual reachability.
If that trade-off is acceptable, proceed.
Step-by-step: Cloudflare + Proxmox DNS-01 (Model 1)
Step 0 — Pick your final URL and commit to using it
Once you install a publicly trusted cert for `pve.yanboyang.com`, you should always use:
If you keep using the IP URL, the browser will continue to warn (hostname mismatch).
Step 1 — Create the Cloudflare DNS record (DNS-only)
In Cloudflare DNS for `yanboyang.com`:
- Type: A
- Name: pve
- IPv4: 172.27.135.44
- Proxy status: DNS only (gray cloud)
Notes:
- “Proxied” does not work for this use case anyway (Cloudflare won’t proxy arbitrary port 8006 like this).
- DNS propagation speed matters later; low TTL can help, but Cloudflare is usually fast.
Step 2 — Create a least-privilege Cloudflare API token
You will need:
- API Token
- Account ID and/or Zone ID (On section Overview)
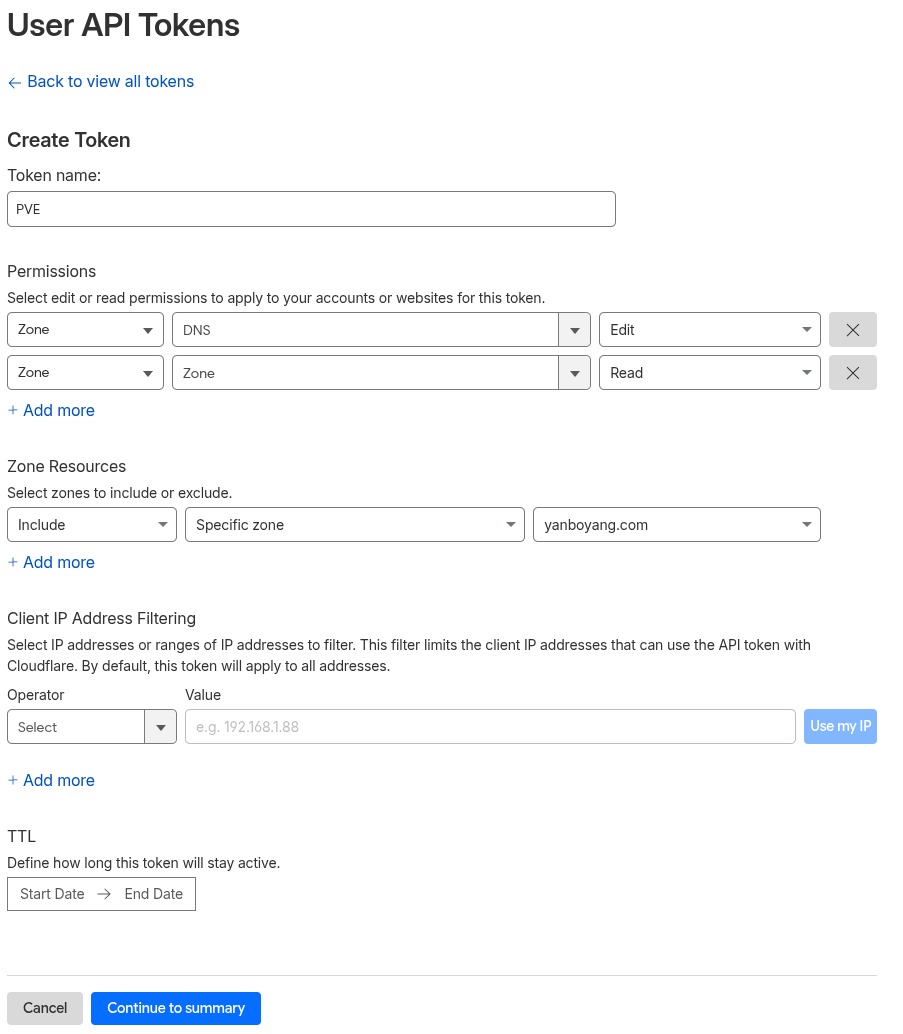
Recommended token scope (typical DNS-01 needs):
- Permissions:
- Zone → DNS → Edit
- Zone → Zone → Read (commonly required by many DNS automation clients)
- Zone Resources:
- Restrict to yanboyang.com zone only
Keep the token secret safe.
Step 3 — Add the ACME DNS plugin in Proxmox (cluster-wide)
Proxmox stores ACME plugin configuration in /etc/pve/priv/acme/plugins.cfg, and the plugin is available to all nodes in a cluster. It also reuses acme.sh DNS plugins for provider-specific APIs.
- Datacenter → ACME
- Under Challenge Plugins, click Add
- Set:
- Challenge Type: DNS
- DNS API: Cloudflare
- Plugin ID: e.g. cf-pve-yanboyang
- You don’t need Cloudflare global api key
- Account ID (require)
- Email (require)
- Token (require)
- Zone ID (require)
Step 4 — Register an ACME account (use staging first)
Proxmox supports Let’s Encrypt production and staging endpoints, and recommends staging first due to rate limits.
GUI:
- Datacenter → ACME → Accounts → Add
- Use Let’s Encrypt V2 Staging initially
- Provide email, accept ToS
CLI (documented example):
pvenode acme account register default you@example.comStep 5 — Configure the domain on the node (node-specific)
In a cluster:
- The plugin is shared cluster-wide.
- The domain binding is node-specific.
GUI:
- Select a node (e.g., the one you access at 172.27.135.44), my one server1
- Node → Certificates
- Add an ACME domain:
- Challenge Type: DNS
- Plugin: cf-pve-yanboyang
- Domain: pve.yanboyang.com
- Account: your staging account (for testing)
CLI pattern (from Proxmox docs):
pvenode config set -acmedomain0 pve.yanboyang.com,plugin=cf-pve-yanboyangStep 6 — Order the certificate and install it
GUI:
- In Node → Certificates, click Order Certificate (ACME)
CLI:
pvenode acme cert orderOn success, Proxmox restarts pveproxy (you’ll see this in the task output). Proxmox uses:
- /etc/pve/local/pveproxy-ssl.pem and its key for the web UI TLS cert, and notes /etc/pve/local is node-specific.
Step 7 — Switch from staging to production
Once the staging flow works end-to-end:
- Create a production ACME account (Let’s Encrypt Production).
- Select it for the node domain entry.
- Order the certificate again.
This avoids rate-limit surprises during debugging.
Renewal behavior
Proxmox states: “Renewal will happen automatically.” Operationally, you should still verify this once:
# Show configured domains and plugin binding
pvenode config get | grep -i acme

# (Optional) Force a renewal test (typically unnecessary in normal ops)
pvenode acme cert renew --force