Proxmox VE uses Linux Containers (LXC) as its underlying container technology. The “Proxmox Container Toolkit” (pct) simplifies the usage and management of LXC, by providing an interface that abstracts complex tasks.
Containers are tightly integrated with Proxmox VE. This means that they are aware of the cluster setup, and they can use the same network and storage resources as virtual machines. You can also use the Proxmox VE firewall, or manage containers using the HA framework.
The primary goal is to offer an environment that provides the benefits of using a VM, but without the additional overhead. This means that Proxmox Containers can be categorized as “System Containers”, rather than “Application Containers”.
NOTE: If you want to run application containers, for example, Docker images, it is recommended that you run them inside a Proxmox Qemu VM. This will give you all the advantages of application containerization, while also providing the benefits that VMs offer, such as strong isolation from the host and the ability to live-migrate, which otherwise isn’t possible with containers.
Helper Script
https://github.com/tteck/Proxmox/blob/main/ct/create_lxc.sh
wget https://raw.githubusercontent.com/tteck/Proxmox/main/ct/create_lxc.sh
chmod +x create_lxc.sh
./create_lxc.sh
PVE Container Images Download
Container images, sometimes also referred to as “templates” or “appliances”, are tar archives which contain everything to run a container.
Proxmox VE itself provides a variety of basic templates for the most common Linux distributions. They can be downloaded using the GUI or the pveam (short for Proxmox VE Appliance Manager) command line utility. Additionally, TurnKey Linux container templates are also available to download.
The list of available templates is updated daily through the pve-daily-update timer. You can also trigger an update manually by executing:
pveam updateTo view the list of available images run:
pveam availableYou can restrict this large list by specifying the section you are interested in, for example basic system images: List available system images:
root@richie:~# pveam available --section system
system          alpine-3.11-default_20200425_amd64.tar.xz
system          alpine-3.12-default_20200823_amd64.tar.xz
system          archlinux-base_20200508-1_amd64.tar.gz
system          archlinux-base_20201116-1_amd64.tar.gz
system          centos-7-default_20190926_amd64.tar.xz
system          centos-8-default_20191016_amd64.tar.xz
system          debian-10-standard_10.5-1_amd64.tar.gz
system          debian-9.0-standard_9.7-1_amd64.tar.gz
system          fedora-32-default_20200430_amd64.tar.xz
system          fedora-33-default_20201115_amd64.tar.xz
system          gentoo-current-default_20200310_amd64.tar.xz
system          opensuse-15.2-default_20200824_amd64.tar.xz
system          ubuntu-16.04-standard_16.04.5-1_amd64.tar.gz
system          ubuntu-18.04-standard_18.04.1-1_amd64.tar.gz
system          ubuntu-20.04-standard_20.04-1_amd64.tar.gz
system          ubuntu-20.10-standard_20.10-1_amd64.tar.gz
root@richie:~#
Before you can use such a template, you need to download them into one of your storages. If you’re unsure to which one, you can simply use the local named storage for that purpose. For clustered installations, it is preferred to use a shared storage so that all nodes can access those images.
pveam download local ubuntu-22.10-standard_22.10-1_amd64.tar.zst
pveam download local ubuntu-22.04-standard_22.04-1_amd64.tar.zstroot@richie:~# pveam list local
NAME SIZE
local:vztmpl/ubuntu-20.04-standard_20.04-1_amd64.tar.gz 204.28MB
root@richie:~#Steps for create a new LXC Container
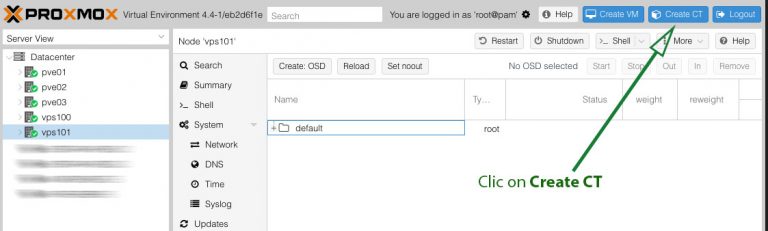
- Open Proxmox web
- Select Server View then select your Node then click on Create CT
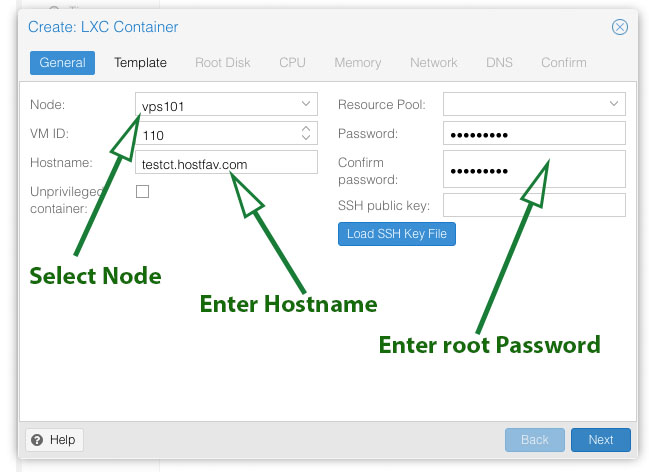
- Enter hostname and Password
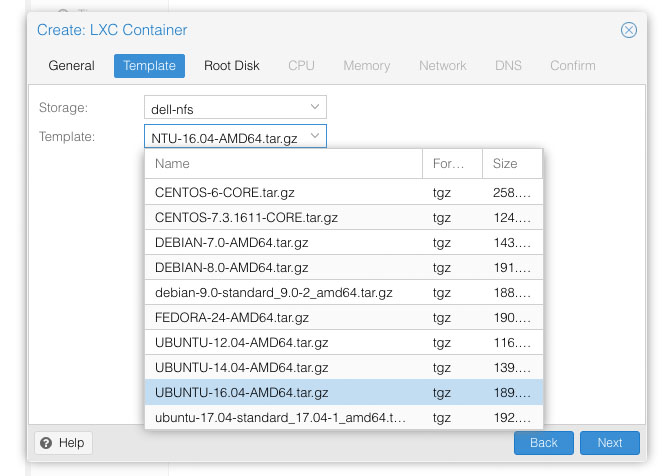
- Select Template Storage and then Select OS from Dropdown List and click on Next
- Enter Disk Size
- Enter Number of CPU Cores
- Enter RAM size in MB
- Enter Network Details
- Enter Name Servers Details
- Click on Finish
Wait for the task to complete.
 You Proxmox Container is ready.
Open Container Initiative (OCI)
Open Container Initiative (OCI) Images
Proxmox VE can also use OCI images to create containers, both system containers but also application containers. Note that running application containers in Proxmox VE (PVE) is currently considered a technology preview.
A container created from an OCI image still uses the existing LXC framework.
Obtaining OCI Images
In the web interface an OCI image can be uploaded manually or pulled from a registry using the Pull from OCI registry button on the container template view of a storage.
Once the template is on a storage, you can create the container with pct create or use the wizard in the web interface.